| Chapter 2. Trace | ||
|---|---|---|
 |
 |
|
| Chapter 2. Trace | ||
|---|---|---|
| |
|
|
Table of Contents

 |
Title bar: Displays the name of the file you are working on. |
 |
|
 |
Main menu: Contains system commands, which are listed in the form of drop-down menus. |
 |
Toolbars: These are shortcut areas, where you are able to add or delete icons from the defaulted list provided. |
 |
Work area: Where all editing and tracing are done. |
 |
Group manager: In addition to the menu, many operations can be performed directly in the Layer Manager area... |
 |
System toolbar: Enables you to open other modules, and to cut copy and paste objects between them. |
 |
View toolbar: Shortcut buttons for the menu. |
 |
Status bar: The application interaction area with the user. Displays varied information as system units, mouse cursor position etc. |
 |
Modify panel: Shortcut buttons for the menu. |
 |
Message panel: When user input is needed for some of the menu commands, it will appear in this area. |
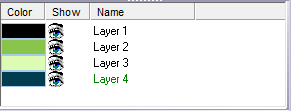
| Color | When selecting a new layer, a color is automatically
chosen for you. If you decide to select your own representative color
for a layer, select the colored bar for the relevant layer:
 |
|||
| Show | Enables you to select the layers you want displayed on an image. Ensure is selected from the Menu; all the eye icons will be open. To hide or reveal a layer, click on the eye icon. A closed eye icon means the layer is hidden. | |||
| Name |
To make a layer active click on the layer's name; the layer will be highlighted meaning it is active. To change a layer's name right-click, and select from the menu.
|

|
Select this option to reveal a previously hidden layer. The eye icon will change from closed to open. |
|
| Hide a layer. The eye icon will change from open to closed. | |
|
Mark all entities within the highlighted layer. |
|
| Change group name. | |
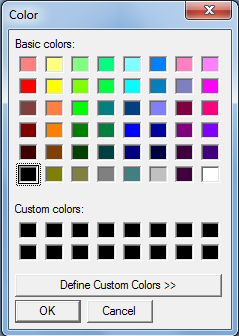
| Change Color. | |
| Adds a new layer. | |
| Erase the current layer. All entities in this layer will be deleted (you will be prompted to confirm this action if entities are going to be deleted). | |
| Opens the help file. |
| |
|
|
| Help Menu |  |
File Menu |
![[Note]](../images/note.png)